Improved Pannier Latches

Update to Panniers, as suggested by Mike, Used the straps to hold it close. Looks and feels solid, but I am going to add 1 more as a fail safe ...

I was also able to drill out and remove the stuck rivets without more damage (one more skill added). In the second pic you see the crack form the second rivet hole. For now I am going to ride it for next 2 months and plan to fix the plastic in Dec .
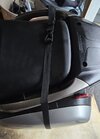
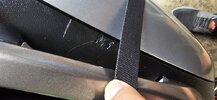
20240929_131618 NT Pannier.jpg

20240929_131606 NT Pannier.jpg
 
Clever idea using one strap for both panniers, I used one per side. Until you can repair the plastic, you may want to consider drilling a small hole at the end of the crack to stop the crack from growing. From the looks of the crack, I think a layer of fiberglass woven roving on the interior of the pannier housing would prevent future cracks. I would still use a metal backing plate to relieve the clamping stress on the interior of the housing.

Mike
HI Mike,

I am still using one strap for one side. The right side pannier is ok, its the left that has always caused the problems.

Good idea on the hole, I will do that right away.

I will research the fiberglass, but I was just thinking of JB Welding the metal plate to the inside.

Sunny
 
I suspect that the JB Weld would do just as good a job on attaching the backing plate but I was thinking of the fiberglass reinforcement as a larger base reinforcement in addition to the metal plate. The pannier base is pretty thin and UV rays will continue to deteriorate the plastic substrate.

Mike
 
Has anyone considered using two of the Owach or Southco latches per case? Owach makes a non-lockable version and Southco also (although only in the larger latch size). I’m thinking of using one of each per case. Wonder if any increase in rigidity would be beneficial. Are y’all satisfied with the single latch installation, or might you consider 2 per side were you to get a do-over? :think1:
My bike came with two locking Owach latches on the left saddlebag. I bought two non locking Owach latches. Plan is to replace one locking latch on the left bag with a non-locking one and end up with a locking latch and a non-locking latch on each saddlebag.
 
After several go-arounds with many other members regarding the external latches that I choose to install on my bike. I decided to replace them with a sleeker and motorcycle in appearance latches.

I settled on some latches made by OWACH Industrial Hardware available on Amazon, OWACH - CL-307-2L. The locks on these have 3 tumbler plates in the insert and the provided key fits loosely. Security is better than the ones that these replaced.

Here are several pictures of one of these that I installed last night.

View attachment 13346, View attachment 13347, View attachment 13348, View attachment 13349

These were installed using 1/8" Pop Revits with a 1/16" thick backing plate for rigidity.

I hope that these are more to everyone's liking. I got ripped on the last one that I used.

Let me know what you all think.
Do you have 1 on each side or 2 ?
 
I used only one. I found it to be meet the requirements of securing the lid in place.

Let me know if you need any additional information.
 
Back
Top Bottom