[Review] SW-MOTECH Alu-Rack Toprack From Twisted Throttle

RedLdr1

0
Site Supporter
Moderator
Joined
Dec 12, 2010
Messages
2,590
Location
Woodstock, Georgia
One of the "little" things about the NT that can be annoying is the lack of places to hook a bungee cord for carrying soft luggage or other items. The integrated turn signals and "smooth" rear end can be challenging when looking for a tie down point.

To address this I mounted the SW-MOTECH Alu-Rack Toprack on my NT today. The installation is very straight forward, the most difficult part of the install is cutting the two holes for the front spacers and bolts in the black plastic cover. I did that with a reamer and Dremel tool using a sanding drum attachment. Try to stay inside the lines Honda thoughtfully provided for their mount on the underside of the cover and it is easy... Now I have several "hard points" to attach items like my Chase Harper 4200 Hideaway Tail Trunk that I keep in my "baguette" hole in case I need extra storage...:D

Here are a couple of photos:


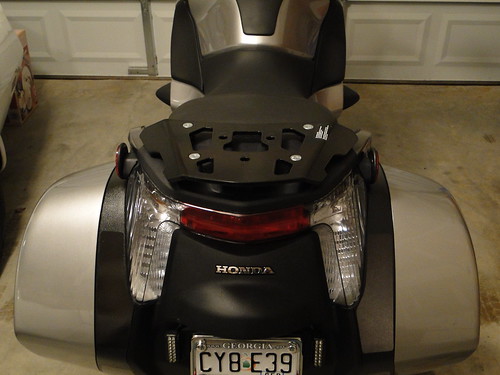
Mounted Rackhttp://www.flickr.com/people/wecnwise/


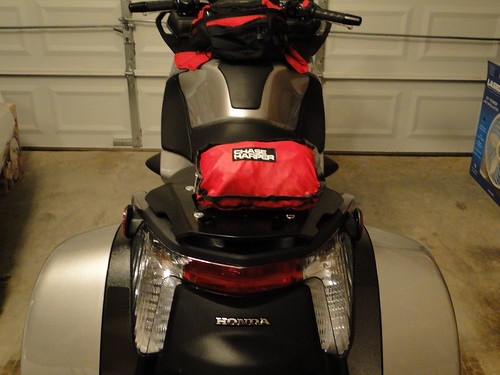
Rack with Closed Chase Harper http://www.flickr.com/people/wecnwise/


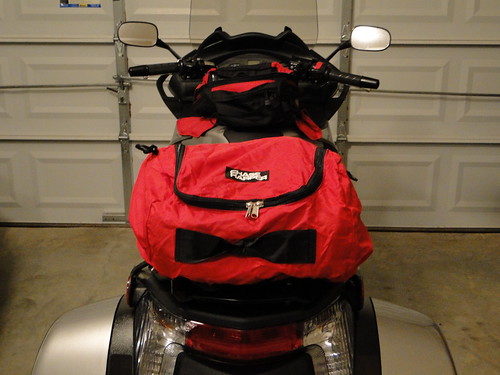
Rack with Open Chase Harper http://www.flickr.com/people/wecnwise/

Since I won't be adding a Top Box this completes my luggage farkles...at least for now...:rolleyes1:
 
That looks nice. Color coordinated and all.
I am starting to think buying this motorcycle is a real stimulus for the economy most of us have been spending a bunch of money on our new sweetie. :)
 
Great to see another option on that backside Wayne. Looks good as well.
 
I have the same rack. I usually have my GIVI trunk mounted on top of it. The GIVI mount can be removed with 3 quarter-turn screws to get back to the nice flat rack in your pictures. SW-Motech makes quick mount adapters for other brands of top cases, too. Very nice product.
 
Here goes Igo waking up old threads again.
I can't tell from the Twisted Throttle web site if this rack is flat between the dog ears or if it has a slight curve. Do you think it can be flipped and mounted upside down? Is there enough metal to countersink the mounting screws if it were mounted upside down? It looks like one could flip it, shorten the front spacers a tad and create a level plain between the rack and the back seat. Using an end mill to create hold down strap slots in the forward dog ears the dog ears would make a great saddle for a dry bag.
Hmmmm. May I ask how wide this rack is at its widest approximately? Twisted throttle has a very rugged dry bag that could sock into this set up right nicely andn after machine work this could still look quite nice.
 
Dave asked, "Can someone with a Honda Top box take the box off and take photographs of the rack and base to compare to the SW-Motech GPT.01,615,100,B above in this thread please?"

Dave, look at the top of this page and, Voila!, there you go!
 
Here goes Igo waking up old threads again.

I can't tell from the Twisted Throttle web site if this rack is flat between the dog ears or if it has a slight curve. It is flat.

Do you think it can be flipped and mounted upside down? Yes

Is there enough metal to countersink the mounting screws if it were mounted upside down? No, that is why I didn't flip it when I installed it to create a "cradle". If you flip it you will need to use washers with the bolts in my opinion.

It looks like one could flip it, shorten the front spacers a tad and create a level plain between the rack and the back seat. Maybe, but you would need to bevel rear spacers as well I think. Using an end mill to create hold down strap slots in the forward dog ears the dog ears would make a great saddle for a dry bag. Hmmmm.

May I ask how wide this rack is at its widest approximately? The flat section measures 10 inches at the front, 7 inches at the rear, 8 inches from front to rear...

Twisted throttle has a very rugged dry bag that could sock into this set up right nicely and after machine work this could still look quite nice.
See my answers in BOLD
 
Twisted Throttle sells this adapter plate that attaches to the above rack using 3 Quick-Loc screws.
11800-500x600.jpg


SW-MOTECH Alu-Rack Topcase Adapter Plate for attaching Soft Luggage


If you do decide later you want a top box, Twisted Throttle/SW Motech sells adapter plates for almost any aftermarket case. Very handy system.
 
Last edited by a moderator:
Exactly. AND save $150.

People always think that making your own stuff is this fabulous cost-saving thing. But when you consider how much I spend on tools, and on materials for projects that didn't turn out satisfactorily, I probably spend more on my DIY stuff than I would ever spend on pre-made stuff. And that doesn't even take into account the time I spend. No, the only reason to make your own stuff, is so you can get exactly what you want. If you can buy something you like better, ready-made, that's definitely the way to go.
 
People always think that making your own stuff is this fabulous cost-saving thing. But when you consider how much I spend on tools, and on materials for projects that didn't turn out satisfactorily, I probably spend more on my DIY stuff than I would ever spend on pre-made stuff. And that doesn't even take into account the time I spend. No, the only reason to make your own stuff, is so you can get exactly what you want. If you can buy something you like better, ready-made, that's definitely the way to go.

Plus I just enjoy doing it. I LOVE working on my projects.
 
I know with the Givi rack, I didn't have to remove the hand rails like the instructions call for. I was able to stick the spacers/washers underneath. I guess that's one of the plus' of having smaller hands.:)
 
I removed the handrails without dropping a spacer into the black hole. I used a gizmo (don't know what you call it) that was cone shaped and a bit bigger than the required drill bit. I think it was designed to make holes in dry-wall. It did just fine in rasping out a hole in the plastic.
 
Wayne,
Did you have to remove the passenger grab rails to do the install? I just ordered one of these and will be putting it on next week.
Also, did you use a special drill bit to get the countersink they say to put in?
Thanks.

Eric,

I did remove the rails as for a change I followed the instructions...:rolleyes1: The special nuts Rick mentioned should be "snapped in" and not fall out, at least they did not on my bike... Make sure the nuts you will add "snap in" to their pockets as well!

The bottom side of the cover is marked with two circles for the plastic you need to remove. I drilled a pilot hole, then used a reamer tool like Phil mentioned, and the used a sanding drum attachment on my Dremel tool to finish the job.

I was never any good at "staying inside the lines" coloring so staying inside the circle was the biggest challenge for me...
 
I only removed the grab rail the first time. Once I had seen what was under there, how those nuts work, it wasn't needed. Perhaps the next person to take the grab rail off can post photos so no one else has to remove the grab rail and drop those spacers ever again.

The special nuts don't precisely "snap" in, but there are nubs that hold them in place if they aren't jostled too much. I actually duct taped them to the underside of the grab rails so that when I removed the screws over and over again, they wouldn't fall out.
 
Back
Top Bottom