Hunting an adhesive recommendation

basketcase

Site Supporter
Joined
Dec 30, 2021
Messages
60
Location
Alabama, USA
Bike
2010 Silver NT700V
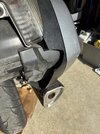
So yesterday I'm working the back fender out of the recesses getting ready for a tire change and I noticed a crack in the pvc. It was already there but invisible when not under pressure.

About the time I said to myself "I better be careful with that" the crack advanced in a loop so a piece of pvc popped out and landed on the deck.

The pieces fit back perfectly, but refastening it for a seamless appearance and not to forget, a durable and permanent fix, will be another story.

The type of adhesive I want is one of the plastic-glues that allow a bit of time for "working" the pieces into a snug fit, and then spraying with an activator to accelerate curing.

Can any of you offer a suggestion of something you have used that fits the above criteria?

Thanks in advance,

Rick
 

Attachments

  • 2025-04-16 17.10.52.jpg
    2025-04-16 17.10.52.jpg
    161.4 KB · Views: 16
I had a break on the same part, but a different location a couple years and 10,000 miles ago. What I did was cut and sand a piece of wood to fit on the backside of the break. Then I roughed up the plastic and used JB Weld on the plastic and wood both. Plenty of time to clamp and/or tape into position. Very strong end result. It did take a while to form the wood backing, but you end up with a good repair.

Cliff
 
Rick, I believe the material you are dealing with is polycarbonate not PVC, and as you have found, with age and sunlight it gets very brittle. Probably the best readily available adhesive is JB Weld Plastic Bonder. As Cliff noted above, you will need to reinforce the repair from behind for structural integrity. Be sure to rough up the surface of the polycarbonate to give the material some "tooth" for the plastic bonder to adhere to.

Mike
 
IMO will you first need to enforce the integrity from behind with something like this:

shopping


Fix the part precisely into place (modeller clamps)
The gun quickly heats the wire/staples up so you can melt them in (don't go too deep), the excess prangs get clipped/broken off...

After that some glue action to finish the task; its been said that Cyanoacrylate (superglue) and baking soda work great...
 
I have the gun and staples you suggest, and they work great to assemble the broken parts, but I've found (the hard way) that they don't provide enough strength by themselves to join parts that would be subject to flexing.

Mike
 
Rick, I believe the material you are dealing with is polycarbonate not PVC, and as you have found, with age and sunlight it gets very brittle. Probably the best readily available adhesive is JB Weld Plastic Bonder. As Cliff noted above, you will need to reinforce the repair from behind for structural integrity. Be sure to rough up the surface of the polycarbonate to give the material some "tooth" for the plastic bonder to adhere to.

Mike
Thanks to all for the feedback.

Mike, after reading descriptions and reviews until my eyes were glued shut glazed over I ordered in a tube of the JB Weld product you mentioned. Per the reviews I'll will have a few seconds to get the match just right. That is assuming, of course, that my eyes and nerves don't play tricks on me.

After that sets up a day or two, I'll reinforce the back with a bit of fiberglass mesh and then reassemble.

Otherwise, I'll observe that the Honda engineers who created such a mess for changing a rear tire obviously were not riders. A dedicated rider would go with something more akin to the design of the BMW's or later model Hondas in which one could just unbolt the wheel and slide it out without all of the drama. (It's simpler to remove and reinstall the rear wheel on my GL1800 than it is on the NT).

Onward...
If you've not worked with fiberglass before, there are two types of fiberglass mesh that are available, random and woven roving. The woven roving is the strongest of the two and is the best one to use. Also, use a resin and hardener for the fiberglass reinforcement. It can be messy so be sure to use rubber gloves. Use disposable aluminum cake pans to hold the resin mixture. Be sure to rough up the area to be glassed with sandpaper. Cut a strip of the woven roving to the size needed. Mix the resin and hardener in the pan. Put the woven roving in the pan to soak/saturate with resin. Using a disposable brush, brush a thick layer of resin to cover the area to be repaired. Place the saturated woven roving over the area and use a plastic spreader to smooth the roving out and remove any air bubbles and be sure to overlap the edges of the roving with resin. Allow to cure overnight. Be sure not to use too much hardener in the resin as it reduces the time you have to work with the product before it sets.

Hope this helps!

Mike
 
Huh. I'm thinking of renaming this thread "Rick's rear tire-change commiseration discussion."

Adhesive arrives today. Otherwise, I've decided to go ahead and remove the exhaust as to make the chore simpler (as in, less tight and risky and cuss-worthy), and to replace any sketchy bolts or bits that I discover in the process. And I want to clear the deck on the procedure so I can hit the twisties next month with no anxiety about the completeness of the job.

So my next question is about the exhaust sensor wire. Removing the exhaust calls for disconnecting that wire, which is somehow attached to the frame.

Lacking a table lift (I'm holding off on that until my shop is finished), I am working by feel because I can't get a straight on look at it from the port side. It seems the wire is affixed to the frame with a metal clip that can be unfolded and refolded (and without disassembling the rear swing arm :rofl1: ).

Is that connected with a folding clip assumption correct?
------------
PS: Disregard the above. I managed to answer my own question about the clip.
 
Last edited:
Lacking a table lift (I'm holding off on that until my shop is finished),

I ended up with a home-built lift (stand) with a dropout. With that I could remove the rear wheel without disassembly of muffler/plastic. Just drop the tire and wheel straight down. It was better but as I remember it was still a little awkward in there. Just some more for you to think about.

Arknt
 
Had my NT up on a borrowed motorcycle lift for the rear wheel removal. It was very sketchy and dangerous as the bike doesn't conform to the flat lift. My solution was to use a cherry picker (engine hoist) hooked up to a strap around the passenger grab handles. This ended up being very sturdy and balanced and allowed plenty of room for the wheel removal.
 
Of all the rear wheel removals I have done on my many bikes over the years, the NT700 was the one I dreaded the most. A PITA but not overly complicated. Here is my NT on my HF lift.


SAM_1042.JPGSAM_1043.JPGSAM_1044.JPG
 
Of all the rear wheel removals I have done on my many bikes over the years, the NT700 was the one I dreaded the most. A PITA but not overly complicated. Here is my NT on my HF lift.
Well, no need to remove the muffler, especially when having it on a lift...
I made that mistake only the first time, cause its written in the book... never again...
I've reversed the axle (pulls out to the left now), remove the stop bolt and all spacers (also the collar-bush in the swing-arm clamp) shove the caliper/carrier plate into that "bay" that's up & forward, get the wheel & splines out the ring-gear, tilt the wheel to the left (so it clears the caliper/carrier), roll the wheel out and insert the axle to "park" the carrier plate again (prevents tension on brake like)

photo_2022-11-27_10-52-03-jpg.19998


img_20221126_141602-jpg.19993
I also reversed the axel after the first couple of tire changes. But it was still a pain in the A to get the rear fender piece off and back compared to changing the rear wheel on my other bikes. I solved the problem for good after about 4 years and sold the NT and bought a FJR. That was over 10 years ago.
 
Thanks again to all for the feedback. Especially the photos.

The tire change part is done. She’s now shod with a new set of Michelin Roads. In the interest of candor, I finally caved and took it to the local dealership. Had it back on the trailer and headed home in less than 3 hours.

I’ll get on the plastic repair part tomorrow and then finish putting everything back together.
Nothing to be ashamed of. Up until i got my NT I did all my own tire work, but that was on steel rims. I didnt want to mar the soft aluminum rims so i let a shop with a tire changer do it. I hope you reminded the dealer to lube the drive splines liberally with the correct moly grease. Many arent aware of this requirement.

Mike
 
Back
Top Bottom